This is a must make! I have made this recipe numerous times and it's always a favorite. Jesse especially loves these and how been known to devour several of these in a sitting.
I always use the food color paste that you can find at craft stores, but my mom always uses the liquid food color from the grocery store. I also always pipe the frosting on using a star shaped tip, just another preference of mine.
2 1/2 C cake flour, sifted
2 T unsweetened cocoa powder
1 t salt
1 1/2 C sugar
1 1/2 C vegetable oil
2 large eggs, room temperature
1/2 t red gel-paste food color (or 1 bottle liquid food color)
1 t pure vanilla extract
1 C buttermilk
1 1/2 t baking solda
2 t distilled white vinegar
Cream Cheese frosting (see below)
1. Preheat oven to 350. Line standard muffin tins with paper liners. Whisk together cake flour, cocoa, and salt.
2. With an electric mixer on medium-high speed, whisk together sugar and oil until combines. Add eggs, one at a time, beating until each is incorporated, scraping down sides of bowl as needed. Mix in food color and vanilla.
3. Reduce speed to low. Add flour mixture in three batches, alternating with two additions of buttermilk, and whisking well after each. Stir together the baking soda and vinegar in a small bowl (it will foam); add mixture to the batter, and mix on medium speed for 10 seconds.
4. Divide batter evenly among lined cups, filling each three-quarters full. Bake, rotating tins halfway through, until a cake tester inserted in centers comes out clean, about 20 minutes. Transfer tins to wire racks to cool completely before removing cupcakes. Cupcakes can be stored overnight at room temperature, or frozen up to 2 months, in airtight containers.
5. To finish, use a small offset spatula to spread cupcakes with frosting. Refigerate up to 3 days in airtight containers; bring to room temperature before serving.
Cream Cheese Frosting
1 C unsalted butter, room temperature
12 ounces cream cheese, room temperature
4 C powdered sugar, sifted
3/4 t pure vanilla extract
With an electric mixer on medium-high speed, beat butter and cream cheese until fluffy, 2 to 3 minutes. Reduce speed to low. Add sugar, 1/2 cup at a time, and then vanilla, and mix until smooth and combines, scraping down sides as needed. If not using immediately, frosting can be refrigerated up to 3 days in an airtight container; before using, bring to room temperature, and beat on low speed until smooth again.

Raspberry Marble Cheesecake
First of all, if you do not yet own the Martha Stewart's Cupcake Cookbook, you need to RUN and go get one. I've had mine for almost 2 years, and you should see how dirty and used it looks already (that's a good sign of a well loved cookbook!).
These cheesecake cupcakes are pretty easy and super yummy! I love that they stay good in the fridge in an airtight container for several days.
1 1/2 C. finely ground graham crackers (about 12 sheets; use a mini chopper or food processor)
3 T. unsalted butter, melted
1 1/2 C. plus 5 T. sugar
1 container (6oz) fresh raspberries
2lbs. cream cheese, room temperature
Pinch of salt
1 t. pure vanilla extract
4 large eggs, room temperature
1. Preheat over to 325. Line standard muffin tins with paper liners. Stir together ground grahm crackers, butter, and 3 tablespoons sugar. Press 1 tablespoon crust mixture firmly into bottom of each lined cup. Bake until set, about 5 minutes. Transfer tins to a wire rack to cool.
2. Process raspberries in a food processor until smooth, about 30 seconds. Whisk in 2 tablesppons sugar.
3. With an electric mixer on medium-high speed, beat cream cheese until fluffy, scraping down sides of bowl as needed. With mixer on low speed, add remaining 1 1/2 cups sugar in a steady stream. Add salt and vanilla; mix until well combined. Add eggs, one at a time, beating until just combined after each.
4. Spoon 3 tablespoons filling over crust in each cup. Dollop 1/2 teaspoon raspberry puree in a few dots over each. With a toothpick, swirl sauce into filling.
5. Bake, rotating pans halfway through, until filling is set, about 22 minutes. Refrigerate (in tins) at least 4 hours.

Fruit Smoothie - Paleo Style
This morning I tried a new smoothie and I have to admit, it was amazing! Thought I'd share with everyone!
1 C. coconut milk
1 T. almond butter
1/2 C. frozen berries (I used raspberries)
1/2 t. honey (optional)
Throw in all in a blender and voila!

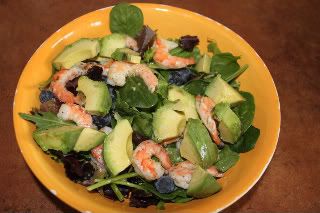
A lot of people have been asking me lately what I eat for lunch while following a paleo lifestyle. I almost always have a salad of some sort. I have a new favorite this week, so I thought I'd share:
Spinach or mixed greens (I use a combination of both)
Shrimp (I get the cilantro lime shrimp from Costco)
Blueberries
1/2 Avocado
Grapefruit Vinaigerette (see recipe below)
Grapefruit Vinaigrette
1/4 C. fresh grapefruit juice
1 T. honey
1 t. dijon mustard
1/2 t. salt
1/4 t. pepper
6 T. olive
Combine all ingredients in a shaker and shake until combined.

Very Cherry Lara Bars
I recently got addicted to Lara Bars. They are a delicious and Paleo friendly nut and fruit bar that get expensive quick when you begin eating one everyday for breakfast! Most of the bars only have a few ingredients that consist of dates, nuts, dried fruits, and sometimes some spices. I decided that with so few ingredients, it couldn't be too hard to make! They turned out awesome!
1 c. dates, pitted and chopped
1 c. unsweetened dried cherries
1 1/3 c. finely chopped cashews
1/2 t. cinnamon
1. Place the dates and cherries in a food processor and pulse until it turns into a thick paste.
2. Take the paste out of the food processor and into a bowl. With your hands incorporate the cashews and cinnamon into the paste.
3. Line any type of bakeware (8x8, mini muffin, brownie,etc.) with saran wrap. Press the paste into the bakeware and then cover with saran wrap.
4. Enjoy! These bars will stay good in the refrigerator for up to 5 days.
Fantasy Fudge
3 c. sugar
3/4 c. margarine
2/3 c. evaporated milk
12 oz semi-sweet chocolate chips
1 7oz jar marshmallow creme
1 t vanilla extract
1. Combine sugar, margarine, and milk in a medium saucepan; bring to a full boil, stirring constantly. Continue boiling for 5 minutes over medium heat, stirring.
2. Remove from heat, stir in chocolate until melted.
3. Add marshmallow creme and vanilla. Beat until blended.
4. Pour into a greased 13X9 baking pan.
5. Cool at room temperature; cut into squares. Makes 3lbs.
Chewy Lime Sugar Cookies
2 3/4 c. all purpose flour
1 t. baking soda
1/2 t. baking powder
1/2 t. salt
1 c. butter, softened
1 1/2 c. sugar
1 egg
1/2 t. vanilla extract
Zest of one large lime
3 T. lime juice
1/2 c. sugar (for rolling cookies)
1. Preheat oven to 350. Line cookie sheets silpat or parchment paper.
2. In a small bowl, stir together flour, baking soda, baking powder, and salt. Set aside.
3. Using a mixer, beat together the butter and sugar until smooth and very fluffy.
4. Beat in egg, vanilla, lime juice, and zest.
5. Gradually add dry ingredients.
6. Roll rounded teaspoons of dough into balls and roll in sugar. Place balls on cookie sheets.
7. Bake 8-10 minutes.
Candy Corn & Peanut Topped Brownies

Base:
1 box fudge brownie mix
1/2 c. vegetable oil
1/4 c. water
2 eggs
2 c. mini marshmallows
Topping:
1/2 c. packed brown sugar
1/2 c. light corn syrup
1/2 c. creamy peanut butter
2 c. rice Chex cereal
1 1/2 c. salted peanuts
1 c. candy corn
1. Heat oven to 350 degrees. Grease bottom of 13X9 pan with shortening. In medium bowl, stir brownie mix, oil, water and eggs with spoon until well blended. Spread in pan.
2. Bake 28 minutes or until toothpick inserted 2 inches from side of pan comes out almost clean.
3. Immediately sprinkle marshmallows evenly over warm base; bake 1 to 2 minutes longer or until marshmallows just begin to puff. Cool while making topping.
4. In saucepan, cook brown sugar and corn syrup over medium heat. Stir in peanut butter until well blended. Stir in cereal, peanuts and candy corn until coated. Immedately spoon warm topping over marshmallows, spreading to cover. Cool completely, about 1 hour.
Homemade Macaroni & Cheese

9 T unsalted butter
salt
1lb macaroni shells (I used little penne pasta)
6 T all-purpose flour
3 cups whole milk, heated
2 1/2 c. grated cheddar (I used a blend of monterey jack, cheddar & mozzerella)
salt and pepper to tast
1 c. unseasoned bread crumbs (I used panko)
1. Preheat oven to 350 degrees. Butter a 2 1/2-quart baking dish with 1 T of the butter.
2. Cook pasta per instruction on box.
3. Meanwhile, in a saucepan over medium heat, melt 6 T. of the butter. When the foam begins to subside, whisk in the flour. Cook, whisking constantly, for 2 minutes. Do not let the flour brown. Slowly whick in the hot milk and cook, stirring, until the sauce thickens and boils, about 5 minutes. Add the cheese and cook, stirring, until the cheese melts, about 2 minutes longer. Season with salt and pepper.
4. When the pasta is ready, drain well and place in a large bowl. Pour the cheese sauce over the pasta and stir gently to mix. Transfer to the prepared baking dish. Cut the remaining 2 T. butter into bits and use to dot the surface. Sprinkle with the bread crumbs and dot with the remaining butter. Bake, uncovered, until the top is golden borwn and the sauce is bubbly, about 30 minutes. Serve at once.


